


This getting started guide shows how to install Jbi4Cics and a sample service assembly in OpenESB environment.
Installing CICS JCA Resource Adapter
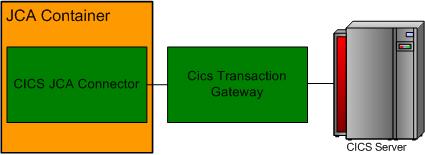
Jbi4Cics calls CICS ECI services via IBM's CTG Transaction Gateway. CTG Transaction Gateway may be called with JCA connector as shown in the following figure:
first thing to do is to install the connector. If you have a CICS Transaction Gateway you should also have a file named cicseci.rar. This file is a deployable resource adapter see CICS Transaction Gateway Home Page and J2EE Connector Architecture Home Page for more information on this topic.
To deploy the cicseci.rar open the Admin Console. After log-in, press button help and follow the instructions under the section Applications/Deploying Application and Modules/To deploy a connector module .
Next step is to configure a connection to your CICS Transaction Gateway and make it visible to the Jbi4Cics Binding Component through JNDI. To do this, you have to follow the instructions in the Admin Console's help section Resources/Connectors/Managing Connector Connection Pools/To create a connector connection pool . In the last page named Create Connector Connection Pool you find the Additional Properties table in which you can add any required properties. Here's the Additional Properties table:

Set the following properties in the additional properties table:
Finally you have to make the steps in section Resources/Connectors/Managing Connector Resources/To create a connector resource . You need the following informations:
Install the Netbeans 5.5 (or newer) IDE and the NetBeans Enterprise Pack . When installing the Enterprise Pack, select to install also the Sun Java System Application Server 9 (that contains OpenESB).
Download the Jbi4Cics component. Install and start the component using the contextual menu on the server JBI module.

After these operations, you can deploy a Service Assembly that uses the Jbi4Cics component.
A service assembly is a deployable item that configure one or more endpoint inside a JBI ESB. We are going set up a configuration that take a CICS ECI service and expose it a SOAP/HTTP Webservice. The configuration is shown in the following figure:
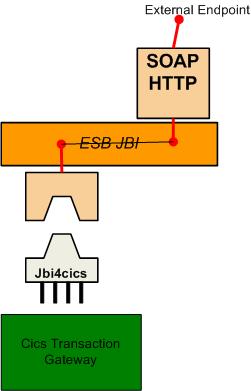
The Jbi4Cics component is used to create an internal (i.e. visible inside the ESB) endpoint. This internal endpoint is then used to create an external endpoint with the OpenESB http soap Binding Component. The http component will proxy the incoming external calls to the internal endpoint exploiting the JBI routing mechanisms.
A service assembly is a zip file containing one or more service unit file, each service unit defines one or more endpoint. We need two endpoint so we're going to configure two service units:
Both service units are a zip file.
A Jbi4Cics service unit has the following layout:
+- xbean.xml
+- <COPY_COBOL>
+- META-INF/
      +- jbi.xml
where:
xbean.xml is a standard xbean file like those used by the Spring framework . It has the following content:
<?xml version="1.0"?>
<beans>
  <bean class="it.imolinfo.jbi4cics.jbi.Jbi4cicsEndpoint">
        <property name="copyCobolFileName" value="<COPY_COBOL>"/>
        <property name="codePage" value="<CODE_PAGE>"/>
    <property name="serviceDescriptor">
      <bean class="it.imolinfo.jbi4cics.webservices.descriptor.ServiceDescriptor">
        <property name="serviceName" value="<SERVICE_NAME>" />
        <property name="serviceInterfacePackageName" value="<SERVICE_PACKAGE_NAME>"/>
          <property name="account">
                <bean class="it.imolinfo.jbi4cics.security.J2CAccount">
                        <property name="username" value="<USERNAME>"/>
                  <property name="password" value="<PASSWORD>"/>
                </bean>
        </property>
        <property name="serviceLocation">
                <bean class="it.imolinfo.jbi4cics.locator.SimpleLocation">
                        <property name="connectionTypeName" value="CICS"/>
                  <property name="locationName" value="<JNDI_CONNECTION_NAME>"/>
                </bean>
        </property>
        <property name="interactionDescription">
                <bean class="it.imolinfo.jbi4cics.connection.jca.cics.CICSInteractionDescription">
                        <property name="programName" value="<PROGRAM_NAME>"/>
                  <property name="transactionName" value="<TRANSACTION_NAME>"/>
                  <property name="tpn" value="true"/>
                </bean>
        </property>
      </bean>
    </property>
  </bean>
</beans>
where:
jbi.xml has the following content:
<?xml version="1.0" encoding="UTF-8"?>
<jbi xmlns="http://java.sun.com/xml/ns/jbi" version="1.0">
  <services binding-component="true"/>
</jbi>
There is no parameter to specify.
Zip all the files in the specified layout and name the archive JBI4CicsSU.zip.
A http service unit using the OpenESB http soap binding component (com.sun.httpsoapbc-1.0-2) must have the following layout:
+- <SERVICE_WSDL.wsdl>
+- META-INF/
      +- jbi.xml
where:
the jbi.xml has the following content:
        <?xml version="1.0" encoding="UTF-8" standalone="yes"?>
        <jbi xmlns="http://java.sun.com/xml/ns/jbi"
                xmlns:ns1="<SERVICE_NAMESPACE>" version="1.0">
                <services binding-component="true">
                        <consumes endpoint-name="<ENDPOINT_NAME>" interface-name="ns1:<SERVICE_INTERFACE>" service-name="ns1:<SERVICE_NAME>"/>
                </services>
        </jbi>
where:
Zip all the files in the specified layout and name the archive HttpSU.zip.
The service assembly is unit of deployable configuration in JBI, in our sample it has the following layout:
+- JBI4CicsSU.zip
+- HttpSU.zip
+- META-INF/
      +- jbi.xml
where:
The jbi.xml has the following format as described in the JBI Specification :
<?xml version="1.0" encoding="UTF-8"?>
<jbi xmlns="http://java.sun.com/xml/ns/jbi" version="1.0">
  <service-assembly>
    <identification>
      <name><SA_NAME></name>
      <description><SA_DESCRIPTION></description>
    </identification>
    <service-unit>
      <identification>
        <name><SU1_NAME></name>
        <description><SU1_DESCRIPTION></description>
      </identification>
      <target>
        <artifacts-zip>JBI4CicsSU.zip</artifacts-zip>
        <component-name>jbi4cics</component-name>
      </target>
    </service-unit>
    <service-unit>
      <identification>
        <name><SU1_NAME></name>
        <description><SU2_DESCRIPTION></description>
      </identification>
      <target>
        <artifacts-zip>HttpSU.zip</artifacts-zip>
        <component-name>com.sun.httpsoapbc-1.0-2</component-name>
      </target>
    </service-unit>
  </service-assembly>
</jbi>
where:
Notice that the BC filenames (JBI4CicsSU.zip and HttpSU.zip) are specified with the respective component (jbi4cics and com.sun.httpsoapbc-1.0-2). Zip all the files in the specified layout and name the archive HttpToCicsSA.zip (the archive name is not important).
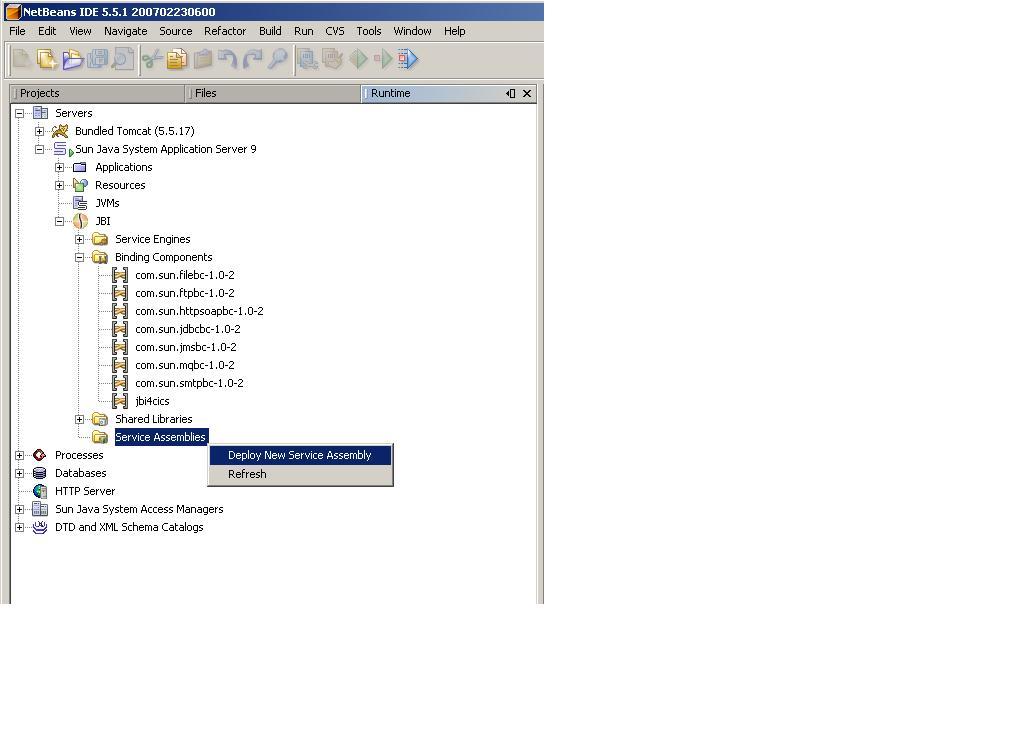
In NetBeans, with the server started, select from "Service Assemblies" the "Deploy New Service Assembly" option and then starts it.
If the Service Assembly starts correctly, you should see both the BC running

Now you can test the service assembly sending a SOAP message to the HTTP endpoint (the service address is specified in the SERVICE_WSDL.wsdl description inside the HttpSU.zip).